vRealize Automation SaltStack Config (vRA SSC) comes with Role Based Access Control (RBAC) allowing you to define permission settings for multiple users. vRA SSC comes with few built-in roles that cannot be deleted: User, Administrator and Superuser. These roles covers the most common requirements, but of course you are allowed to crate user-defined roles for your organization’s unique needs.
To define a role for RBAC in vRA SSC, you must both define the permitted task and also assign resource access. A task is a specific operation that can be performed in the user interface, such a creating, editing, or running a job. A resource is an element of your environment, such specific masters, minions, targets, file data, etc.
The file permission issue
The vRA SSC administrator can create and manage roles from the user interface (Administrator > Roles), however resource access for certain resource types and functional areas must be defined in the API (RaaS), rather than the Roles editor. This is the case for individual files in the File Server. This means that through the UI the administrator can grant a Role to Read, Write or Delete for the File Server functional area, however this has no effect on any file. Access permissions (Read, Write and Delete) for individual files have to be specified using the vRA SSC RPC API. The actual grants on a specific file is the combination of permission defined at both the File Server functional area and the permission specified using the API. Let me try to clarify this with a couple of examples. Example1: assume you have a Role named Viewer that is granted only with Read for the File Server and the same role is granted with Read and Write for file named user.sls. In this situation any user assigned with Role Viewer can only read the user.sls file trough the vRA SSC UI. Example 2: assume you have a Role named Operator that is granted with Read and Write for the File Server and the same Role is only granted with Read for the file named user.sls. In this situation any user assigned to Operator Role can only view the user.sls file trough the vRA SSC UI. In order to allow Role Operator to write the file user.sls it must be granted with Write for both the File Server the user.sls file.
In the remainder of this post I’ll go through how to manage resource access for files in the File Server. vRA SSC API can be accessed in two ways: via an RPC client and via an HTTP (or HTTPS) bridge. It is by far beyond the scope of this post cover more in detail vRA SSC API, here I will focus on the RPC client covering the following topics:
- requirements
- download and install of the RPC client
- connect to your vRA SSC instance and issue RPC calls to set single file permission
- introduce a script to bulk manage file permissions
Requirements
You need to have:
- a vRA SSC instance configured and properly working
- at least a salt environment with few files in the default File Server backend nested into different directories
- a Role to be granted access to files and at least a user assigned to this Role
- a user on the vRA SSC platform member of the Superuser Role (I am not 100% about this, maybe a user member of Administrator Role is enough)
- Python 3.5 or above installed on your local machine (RPC also works with Python 2.7 and above, but working with 3 is highly recommended)
Download and Install the vRA SSC API Client
As a first step we need to get the vRA SSC API client that is a python module named sseapiclient made available as a whl file. The file name would be like the following SSEAPE-8.6.1.4-py2.py3-none-any.whl based on the vRA SSC version you work with. This file is shipped along with the vRA SSC Installer. The following steps are related to vRA SSC 8.6.1, you can adjust for the version that works for you:
- Go to VMware Customer Connect and login with your credentials
- Go to tab Product And Accounts > My product > All products
- Using the browser search function look for “VMware vRealize Automation” and click on the related “View Download Components”
- In the “Download VMware vRealize Automation” if needed select the version that works for you, otherwise simply click on “Go to Downloads” right after vRealize Automation SaltStack Config 8.6.1
- In the “Download Product” page click the “Download Now” button right after “VMware vRealize Automation SaltStack Config 8.6.1 Automated Installer”
- After downloading the file on your local machine, go to the below path to find the
whlfile\vRA_SaltStack_Config-8.6.1.4-1_Installer.tar\vRA_SaltStack_Config-8.6.1.4-1_Installer\sse-installer\salt\sse\eapi_plugin\files - Copy the file to the some local folder or workspace
- Install the
whlfile by using the pip command. See the example below
pip3 install SSEAPE-8.5.0.6-py2.py3-none-any.whlTo check that everything went well you can start a Python interactive session:
$ python3Try to import APIClient from the newly installed sseapiclient module:
>>>from sseapiclient import APIClientIf you just get return to the prompt you are fine, else if you get an error message like ModuleNotFoundError: No module named 'sseapiclient' it means that something went wrong.
Connect to vRA SSC instance and issue RPC calls to set single file permission
The full API documentation for vRA SaltStack Config is available in PDF form at VMware’s API documentation site here while in the VMware docs pages you can access the Working with the API (RaaS) that has some some use cases and examples.
To connect to your vRA SSC instance, start a Python3 interactive session and import he APIClient as we did for our brief test:
$ python3
Python 3.8.10 (default, Nov 26 2021, 20:14:08)
[GCC 9.3.0] on linux
Type "help", "copyright", "credits" or "license" for more information.
>>> from sseapiclient import APIClient
>>>
Now you can run the following command to connect, make sure to replace the string included into angular brackets with you instance details:
>>> client = APIClient('https://<FQDN_vRASSC>', '<USERNAME>', '<PASSWORD>', ssl_validate_cert=False)
>>>
From now on you can use the variable client to run RPC calls using the following syntax:
client.api.<interface>.<method>(parameter=parameter_value)Here <interface> refers to an API endpoint while <method> is a specif API capability. In the remainder of this post we will work with the fs interface that allows us to manage files.
In order to set permission on a specific file we need to use the method save_file_access() that requires two parameters:
file_uuid: UUID referencing desired fileaccess_payload: a python dictionary containing role names as keys and a list of allowed access types as values. Here is an example that assigns to a role named Viewer read and discovery permissions{'Viewer': {'read': True, 'discover': True, 'write': False, 'delete': False}}
In order to obtain the file UUID we will use use the method get_env() providing a single input parameter saltenv that is the Salt environment in which to look for the file.
Here after there is an example showing both the RPC request and response. The response is redacted (see the 3 dots) as the get_env() method returns information for all the files in the environment and in my case it is a pretty long response. You can locate the UUID for the file of interest, in my case I will work with file having path /nginx/init.sls and UUID 2242eeaf-c61a-4e1a-a344-857aa2dc54db
>>> client.api.fs.get_env(saltenv='sse')
RPCResponse(riq=8, ret=[{'path': '/dokuwiki/files/acl.auth.php', 'uuid': '1067401e-4fa7-11e6-88bc-080027a7289c', 'saltenv': 'sse', 'content_type': 'text/plain'},
...
{'path': '/vman/ubuntu_intrepid_pkgfile.mp.gz', 'uuid': '8481b692-2811-43d8-857b-0a029a795c9c', 'saltenv': 'sse', 'content_type': 'application/octet-stream'}, {'path': '/mongodb/init.sls', 'uuid': '0b58681c-9b63-4944-85bc-0869c4165979', 'saltenv': 'sse', 'content_type': 'text/x-yaml'}, {'path': '/nginx/init.sls', 'uuid': '2242eeaf-c61a-4e1a-a344-857aa2dc54db', 'saltenv': 'sse', 'content_type': 'text/x-yaml'}], error=None, warnings=[])
>>>
Now that we have the file UUID we can grant our Role to access it. In this example we will grant read-only access to the Role named Viewer that is granted with Read permission for the File Server functional area. Instruction for creating a custom role are provided here.
>>> client.api.fs.save_file_access(file_uuid='2242eeaf-c61a-4e1a-a344-857aa2dc54db', access_payload={'Viewer': {'read': True, 'discover': True, 'write': False, 'delete': False}})
RPCResponse(riq=10, ret=None, error=None, warnings=[])
You can test this by accessing the vRA SSC user interface with a user member of the Role Viewer and navigate to the file you just granted access to. In my example below the user viewer (member of role Viewer) can access the file but Clone, Delete and Save buttons are all grayed out. Let me elaborate a bit here: the file is accessible thanks to the grant we assigned to the individual file, while buttons are grayed out as an effect to the Viewer role permission (Read only) for the File Server area.

You can now manage RBAC for your individual files with this procedure, however this can be time consuming if you need to manage permissions for many files, this is way I created a little script.
Automate RBAC on multiple files
You can access my little script here. This script has the same requirements reported at the begin of this post. To use it clone the git repository on you local machine, using your terminal cd in to the repository folder and run the following command to see the (minimal) help for usage instructions.
$ python3 assign_rbac_role_env_folder.py -h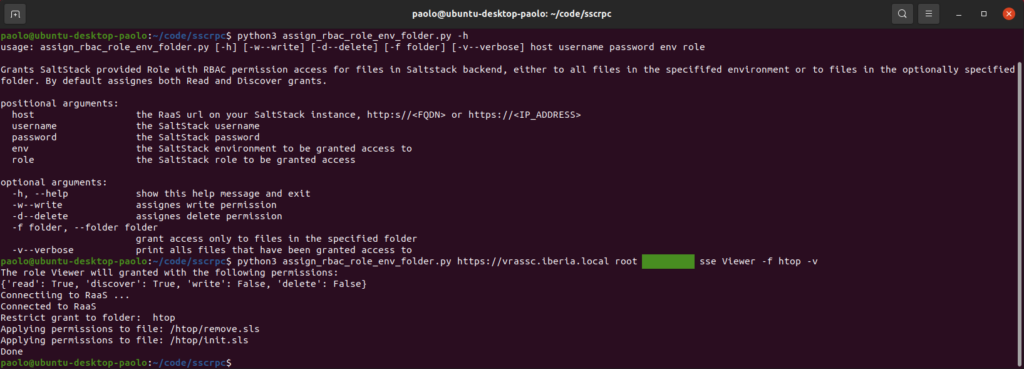
Note: the script accepts an optional parameter named folder provided using -f --folder, this assumes you are providing here the name of a folder that is immediately under the root directory of your default backend file server. The script recursively access files in sub-directories. In the screenshot above I am granting read only access to any file nested under the htop folder.