So far we covered SaltStack remote execution (do you remember the command salt myminionid pkg.install httpd and the Salt Execution Module? If not check this post) which is great and powerful, but it is more suited for spot activities. Actually when you have to manage complex systems configuration at scale you need a combination of many operations, commands and tests each with their peculiarity. This would turn out into a script which is procedural.
Actually Salt also supports (and it is popular for) declarative approach. SaltStack lets you create a re-usable configuration template, called a State file, that describes everything required to put a system or application into a known configuration. With State file SaltStack adopts a declarative approach: you describe the desired state of your managed systems and SaltStack make sure this is applied to the Target you specify. States are described using YAML and are simple to create and read. Honestly, States are much easier to understand when you see them in action, so let’s play with them.
States
States can install packages, manage files, manage users, restart services when changes are made, copy entire directories, explicitly require that other states run first, use variables, and much more. To get a introduction to these capabilities with a very simple, but non trivial, example we will create a State file that installs and provides basic configuration for an Apache Web Server on a CentOS 7 machine. We will do this in a single State file step by step.
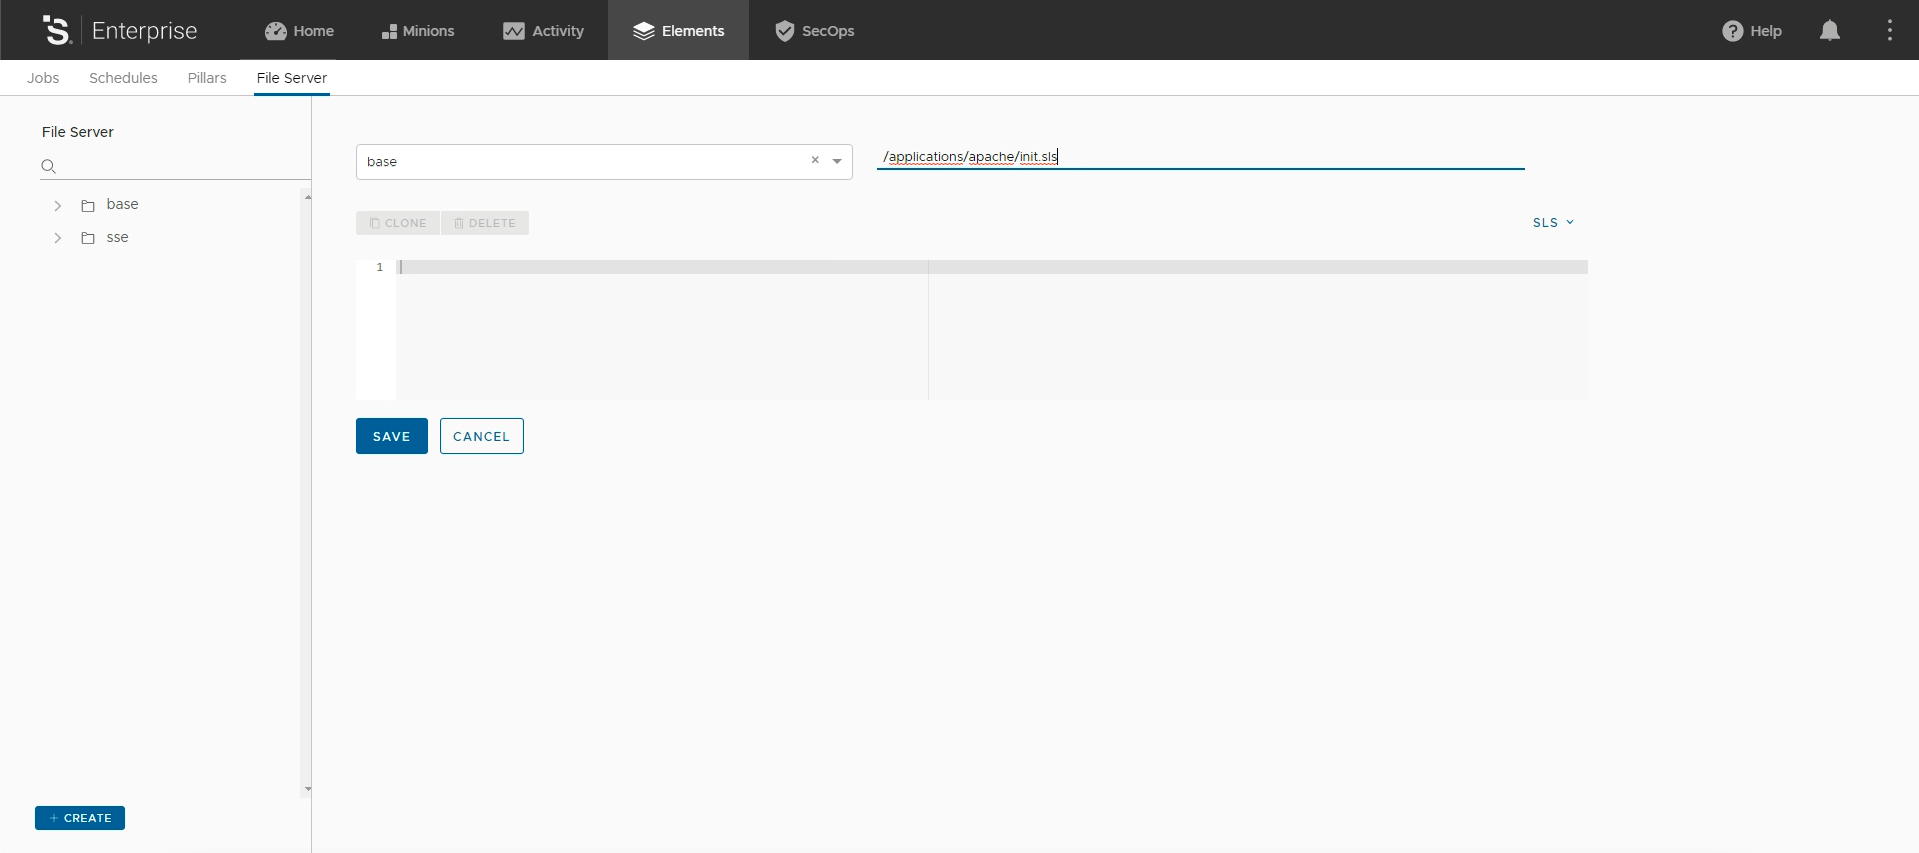
SaltStack cool kids work with YAML file editor (e.g. VS Code) and git repos and we’ll get there sooner or later, but here I think it is better to stick with the vRA SaltStack Config user interface so that we can focus on the heart of the matter. In order to create our state file you have to login in the UI and navigate to Elements > File Server, here you select base in the Saltenv drop down menu and type /applications/apache/init.sls in path name text field as in the picture below. Click on the Save button (that now should be blue and not greyed out) in order to create a (empty) State file named init.sls in the base environment (Saltenv) under the path /applications/apache. This nesting under Applications and Apache directories is not really needed now, but it will be useful in our future activities. In general it is best practice to keep directory structure as flat as possible.
Here we just introduced a couple of new things: File Server and Environment, these are important concept and we might cover them in another post as I do not want to divert now from the main topic. So far it is enough to know that as in SaltStack all configurations are based on files, it comes with a simple File Server suitable to present files for use in the SaltStack state system. In addition to the default File Server backend (named roots) you can configure other backends (e.g. gitfs), here you can access the list of available backends. The SaltStack File Server supports multiple Environments, allowing for State files and other files to be isolated for better organization. Each File Server backend comes with its own way to configure Environments.
Let’s start building our State file step by step. As a first thing we will install the Apache Web Server, the related software package in the Red Hat family is named httpd; it is important to know the package name in the OS family you are working with (remember to automate something you need to know how to do it manually). The piece of YAML configuration required is reported in the snippet below, easy no? Type the snippet below in your init.sls files and hit Save button.
# Install and Configure Apache HTTPD on RHEL/CoreOS

install_apache:
  pkg.installed:
    - name: httpd
OK, what’s in there?
# Install and Configure… this is a comment (so you now know how to add comments!);install_apacheis the identifier declaration for the state section, this can be used to reference this section in other part of the state file;pkg.intalledis the State Module + Function that is respectively the name of the State Module to find the function in (in this casepkg) and the function to call in the named module (in our caseinstalled);name: httpdis an argument, state function will accept a number of arguments depending on the function. In our example the argument name let’s you specify the package to be installed (in our casehpptd).
This is all you need to install Apache! To make it a little more useful we need to add at least a configuration file. Here is the section to be added to our State file to do that (once added make sure to hit Save button).
confgiure_apache:
  file.managed:
    - name: /etc/httpd/conf/httpd.conf
    - source: salt://applications/apache/files/httpd.conf
  require:
    - pkg: install_apache
The snippet above simply copy a file named httpd.conf from the SaltStack master to the Target and make sure this can only happen if the Apache Web Server is actually installed
configure_apacheis the identifier (ID) declaration for the state section;file.managedis the State Module + Function we use to manage files;nameit is the attribute that specifies the absolute path of the configuration file including the file name;sourceis the attribute that identifies the file on the SaltStack File Server to be copied on the Target;requireis a statement that ensure that the named state section is evaluated before the state section requiring it. There are several other direct requisite statements that can be used in Salt that inherently implement failing hard behavior;pkg: install_apacheis an attribute of therequirestatement that allows to define the requisite. In this case we use module:ID (pkg:install_apache), but we can also reference it with module:name (pkg:httpd) or simply by ID (install_apache).
To make this piece of State file actually works we need to make sure the httpd.conf file exists in our Master File Server at the specified path. In the vRA SaltStack Config user interface click on the + Create button in the bottom left of the page, then select base in the Saltenv drop down menu and type /applications/apache/files/httpd.conf in path name text field. Add the following text in the newly created file and than save it.
# RHEL/centos 7.5 (apache 2.4.6)
ServerRoot "/etc/httpd"
Listen 80
Include conf.modules.d/*.conf
User apache
Group apache
ServerAdmin apache@mail.com
<Directory />
    AllowOverride none
    Require all denied
</Directory>
DocumentRoot "/var/www/html"
<Directory "/var/www">
    AllowOverride None
    Require all granted
</Directory>
<Directory "/var/www/html">
    Options Indexes FollowSymLinks
    AllowOverride None
    Require all granted
</Directory>
<IfModule dir_module>
    DirectoryIndex index.html
</IfModule>
<Files ".ht*">
    Require all denied
</Files>
ErrorLog "logs/error_log"
LogLevel warn
<IfModule log_config_module>
    LogFormat "%h %l %u %t \"%r\" %>s %b \"%{Referer}i\" \"%{User-Agent}i\"" combined
    LogFormat "%h %l %u %t \"%r\" %>s %b" common
    CustomLog "logs/access_log" combined
</IfModule>
<IfModule alias_module>
    ScriptAlias /cgi-bin/ "/var/www/cgi-bin/"
</IfModule>
<Directory "/var/www/cgi-bin">
    AllowOverride None
    Options None
    Require all granted
</Directory>
<IfModule mime_module>
    TypesConfig /etc/mime.types
    AddType application/x-compress .Z
    AddType application/x-gzip .gz .tgz
    AddType text/html .shtml
    AddOutputFilter INCLUDES .shtml
</IfModule>
AddDefaultCharset UTF-8
<IfModule mime_magic_module>
    MIMEMagicFile conf/magic
</IfModule>
EnableSendfile on
IncludeOptional conf.d/*.conf
The last bit of the Apache Web Server configuration is to place the hpptd service in the running state. Here is the section to be appended to our State file to do that (once added make sure to hit Save button).
start_apache:
  service.running:
    - name: httpd
    - enable: True
    - watch:
      - file: configure_apache
At this point I think the above snipped is pretty self explanatory with the exception of the watch statement. So let’s clarify it:
watchis a type of requisite, actually this statement is more advanced than therequirestatement. It executes the same logic asrequire: if something is watched it does not need to also be required with the addition of executing logic in case the required states have changed in some way. Thewatchrequisite also checks to see if the watched states have returned any changes. If the watched state executes successfully and the state returns changes, then the watching state will execute a function that reacts to the changes in the watched states.
So our state files should look like this below:
# Install and Configure Apache HTTPD on RHEL/CoreOS
install_apache:
pkg.installed:
- name: httpd
confgiure_apache:
file.managed:
- name: /etc/httpd/conf/httpd.conf
- source: salt://applications/apache/files/httpd.conf
require:
- pkg: install_apache
start_apache:
service.running:
- name: httpd
- enable: True
- watch:
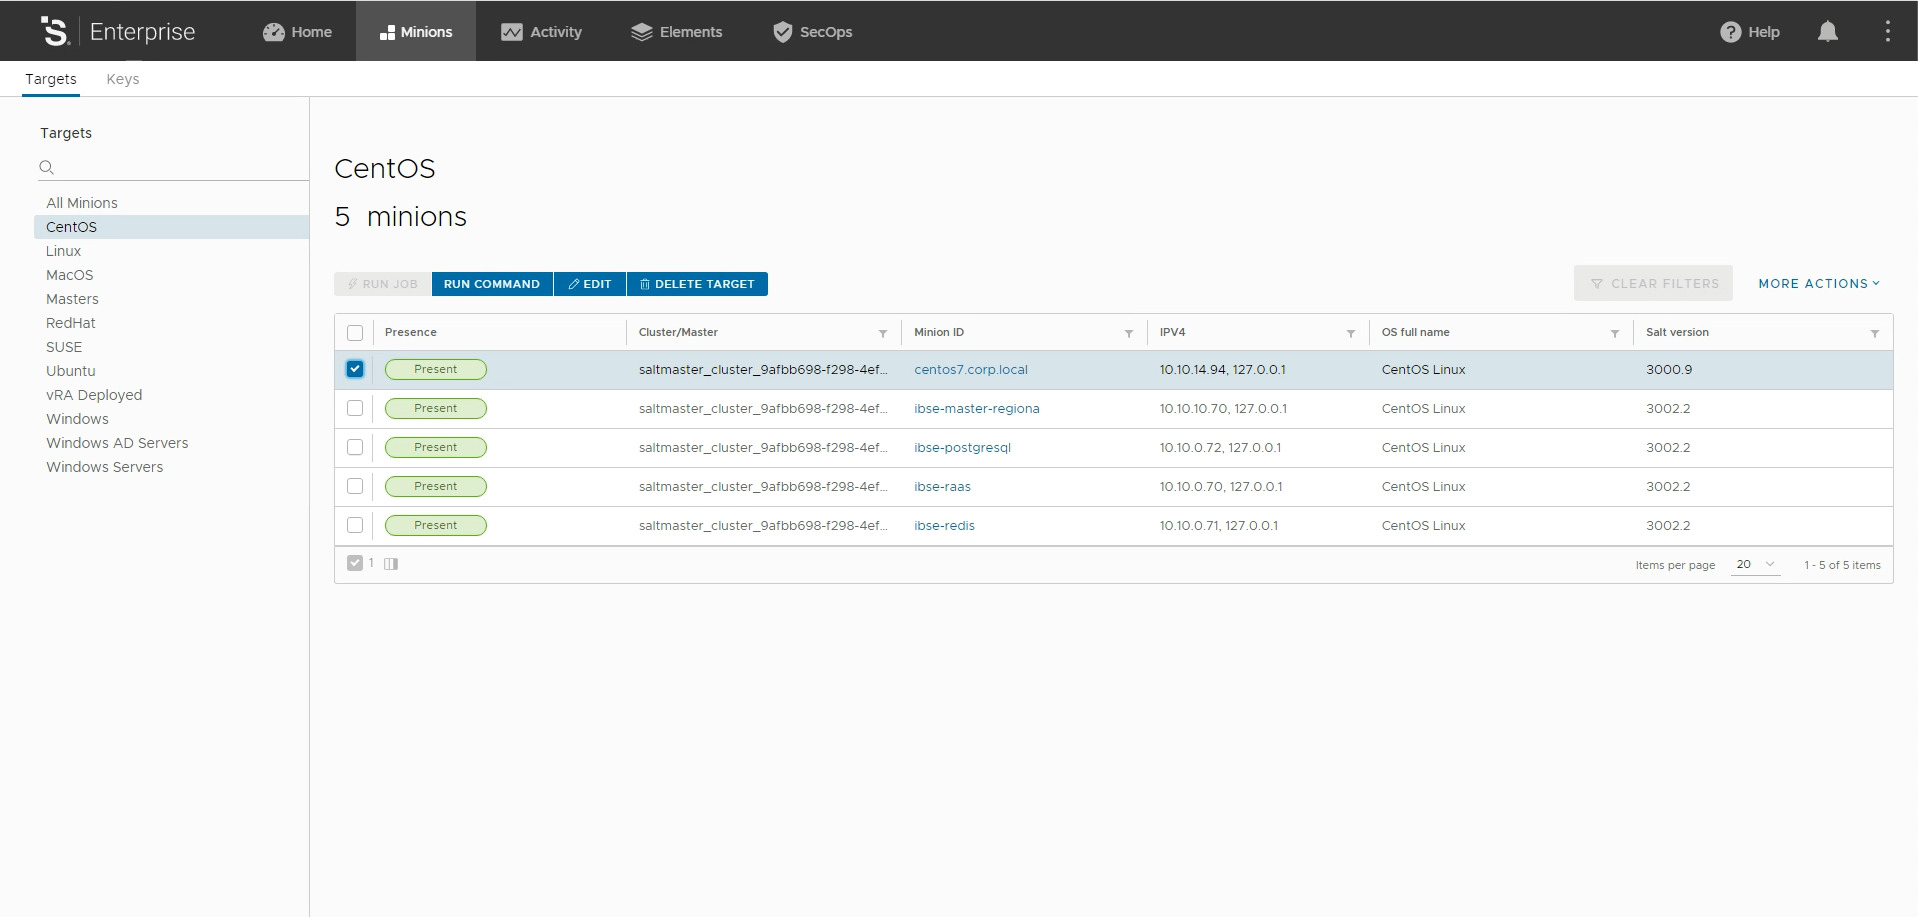
- file: configure_apacheNow it is time to run it, to do that select the Minion ID of a CentOS/RHEL 7, as shown in the screenshot below, and then hit the button Run Command.
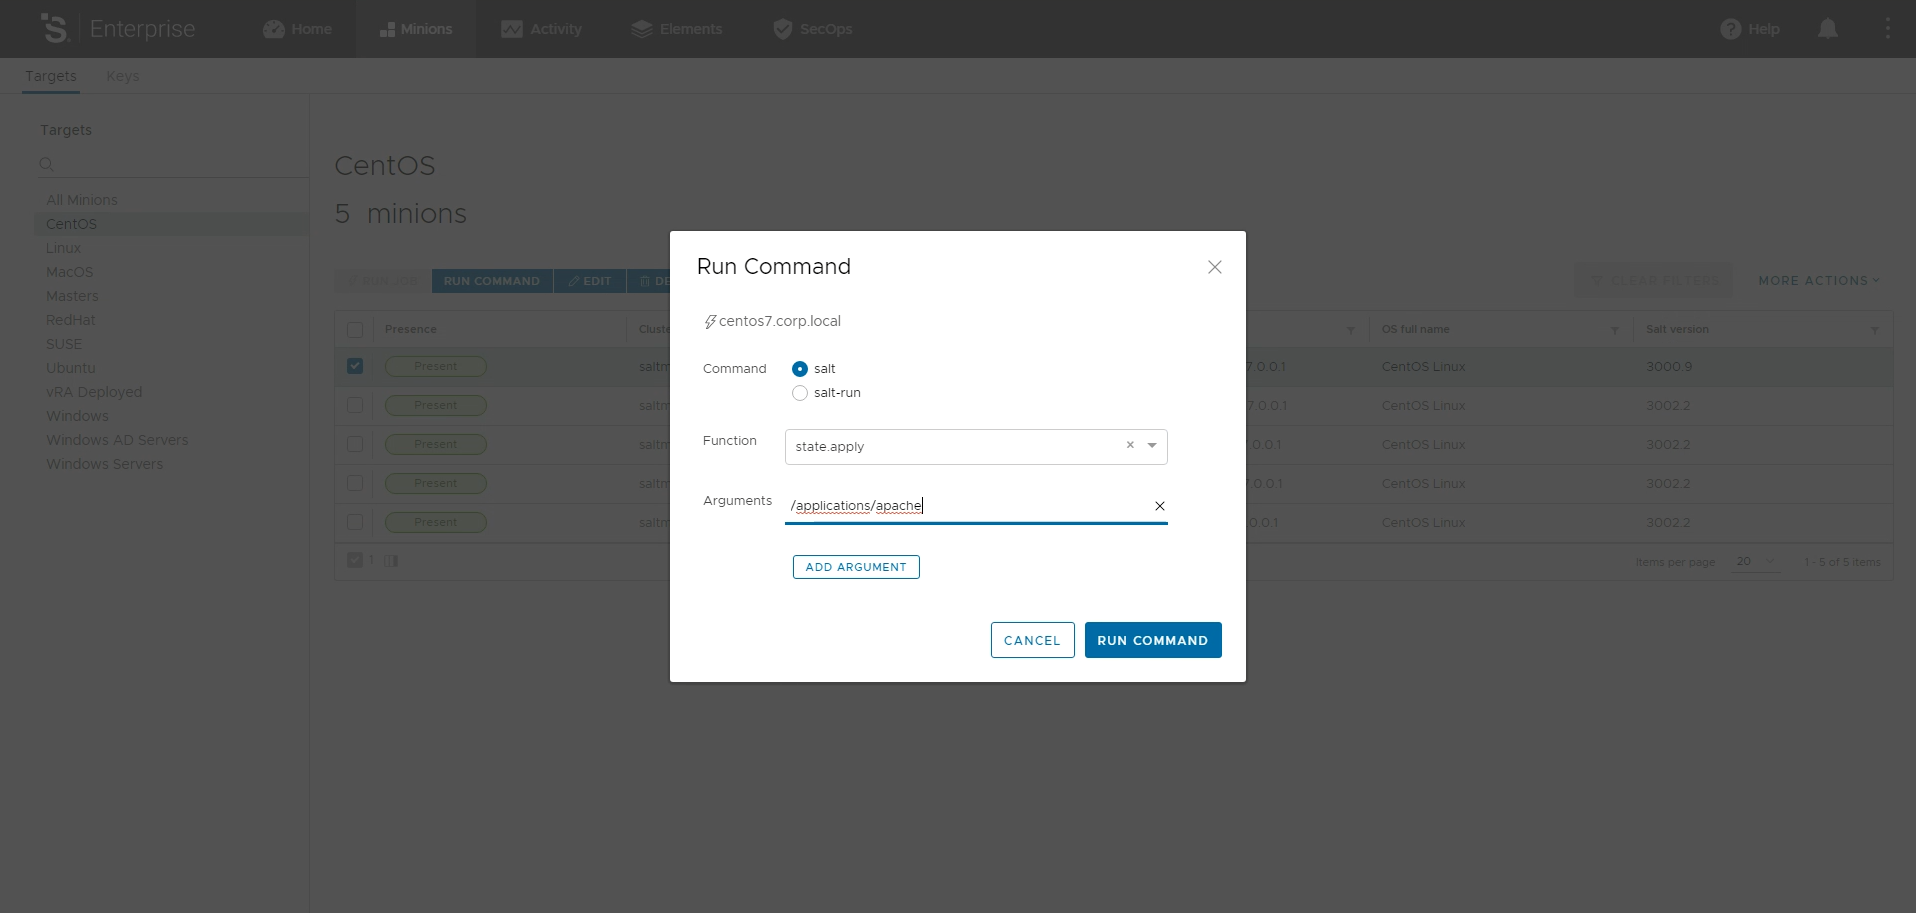
Fill the form as in the screenshot below, please note that we do not need to specify the name of the state file as we used init.sls which is a sort of special state file name, within a folder init.sls is the default state file to be executed by state.apply command.
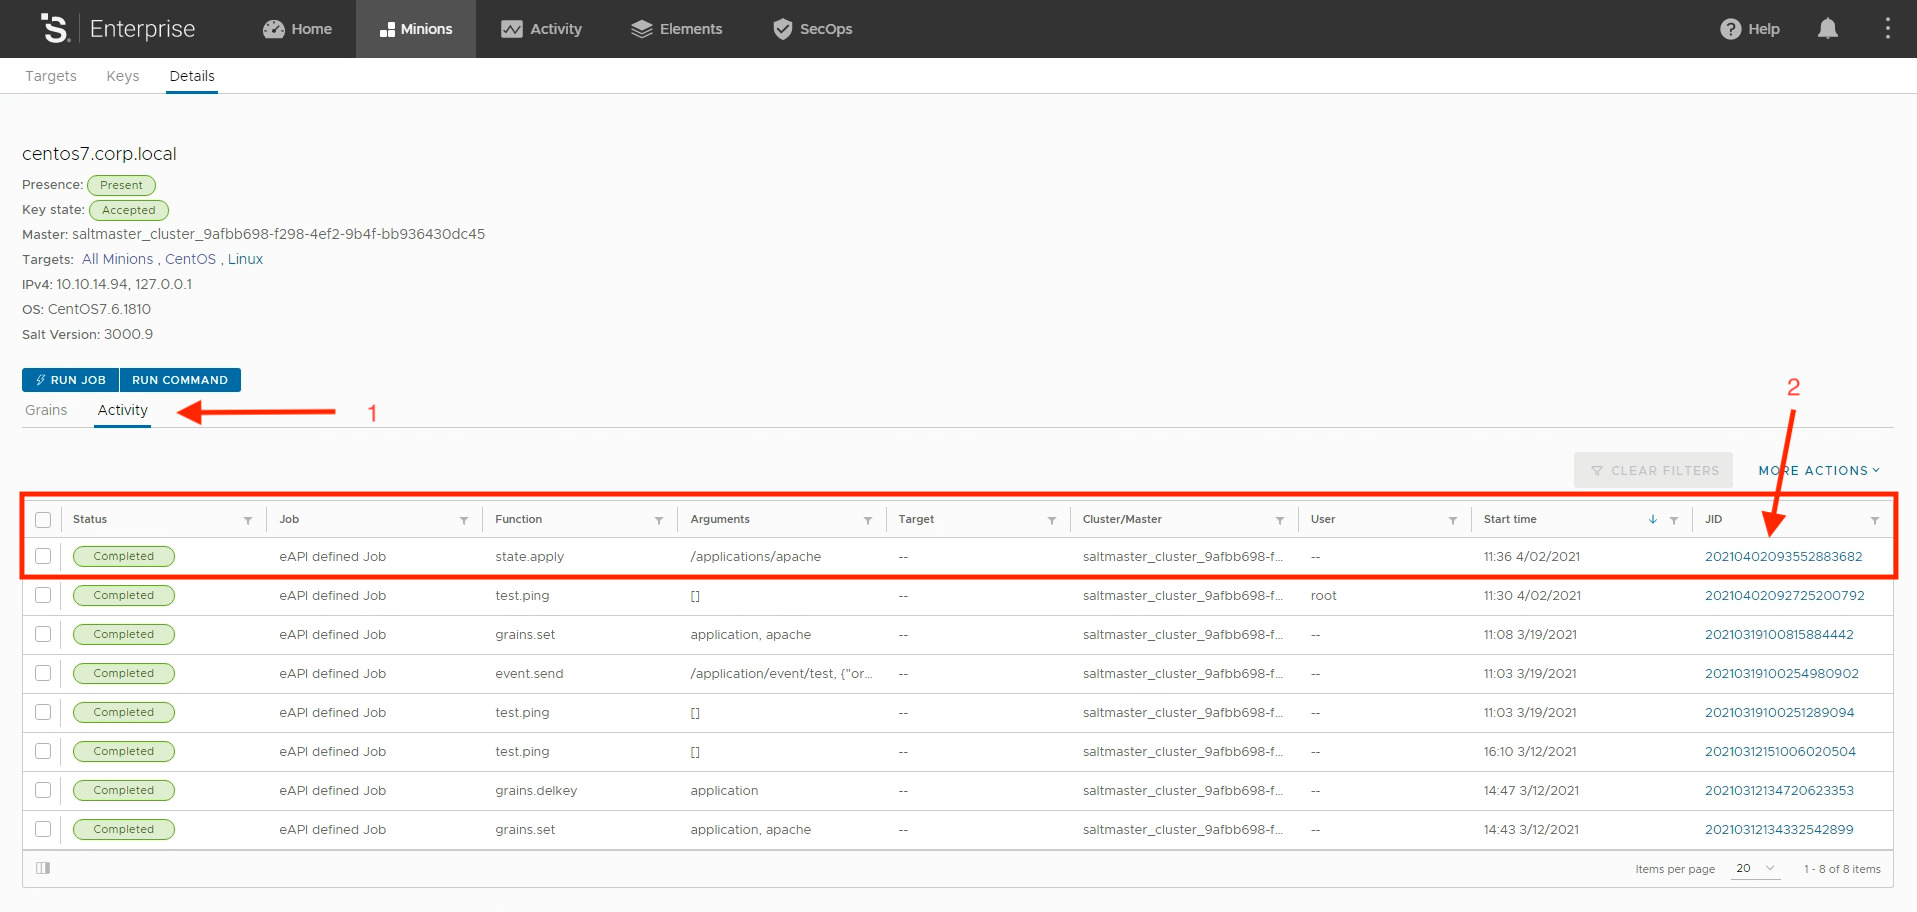
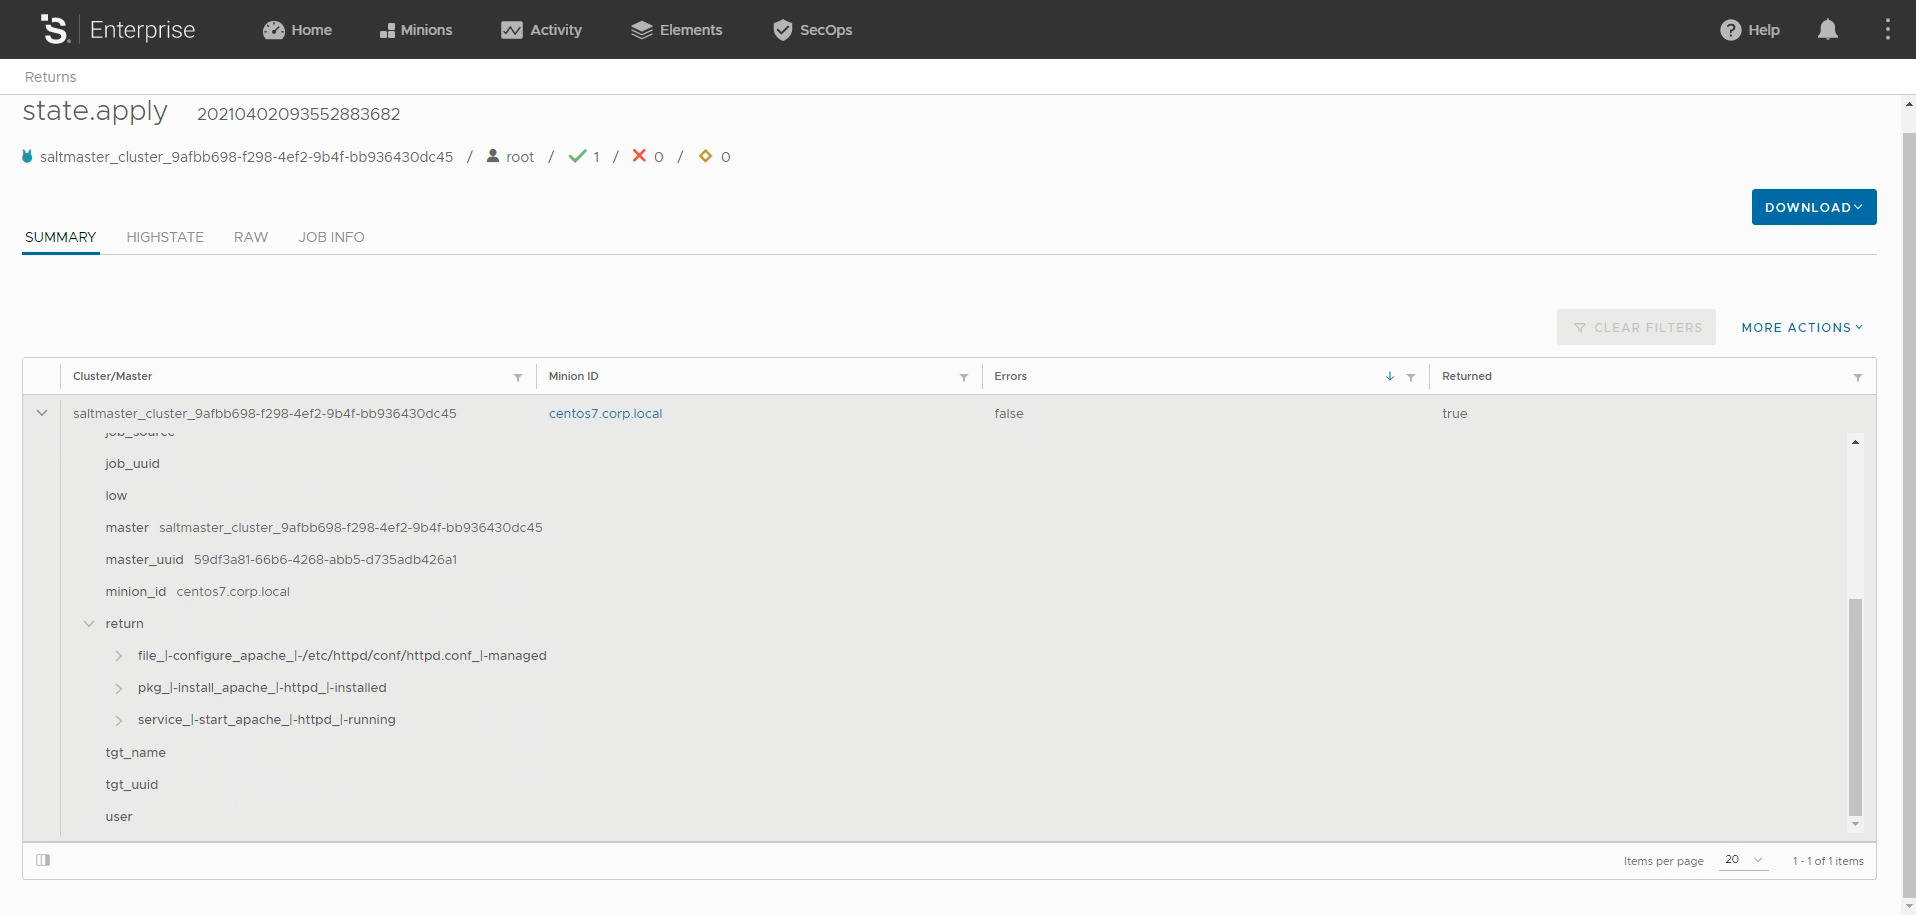
You can check the progress either under the Activity tab or by selecting the Minion ID and then selecting Activity (1 in the screenshot below). Once the command appears as Completed you can click on the the corresponding Job ID (2 in the screenshot below) to access execution details.
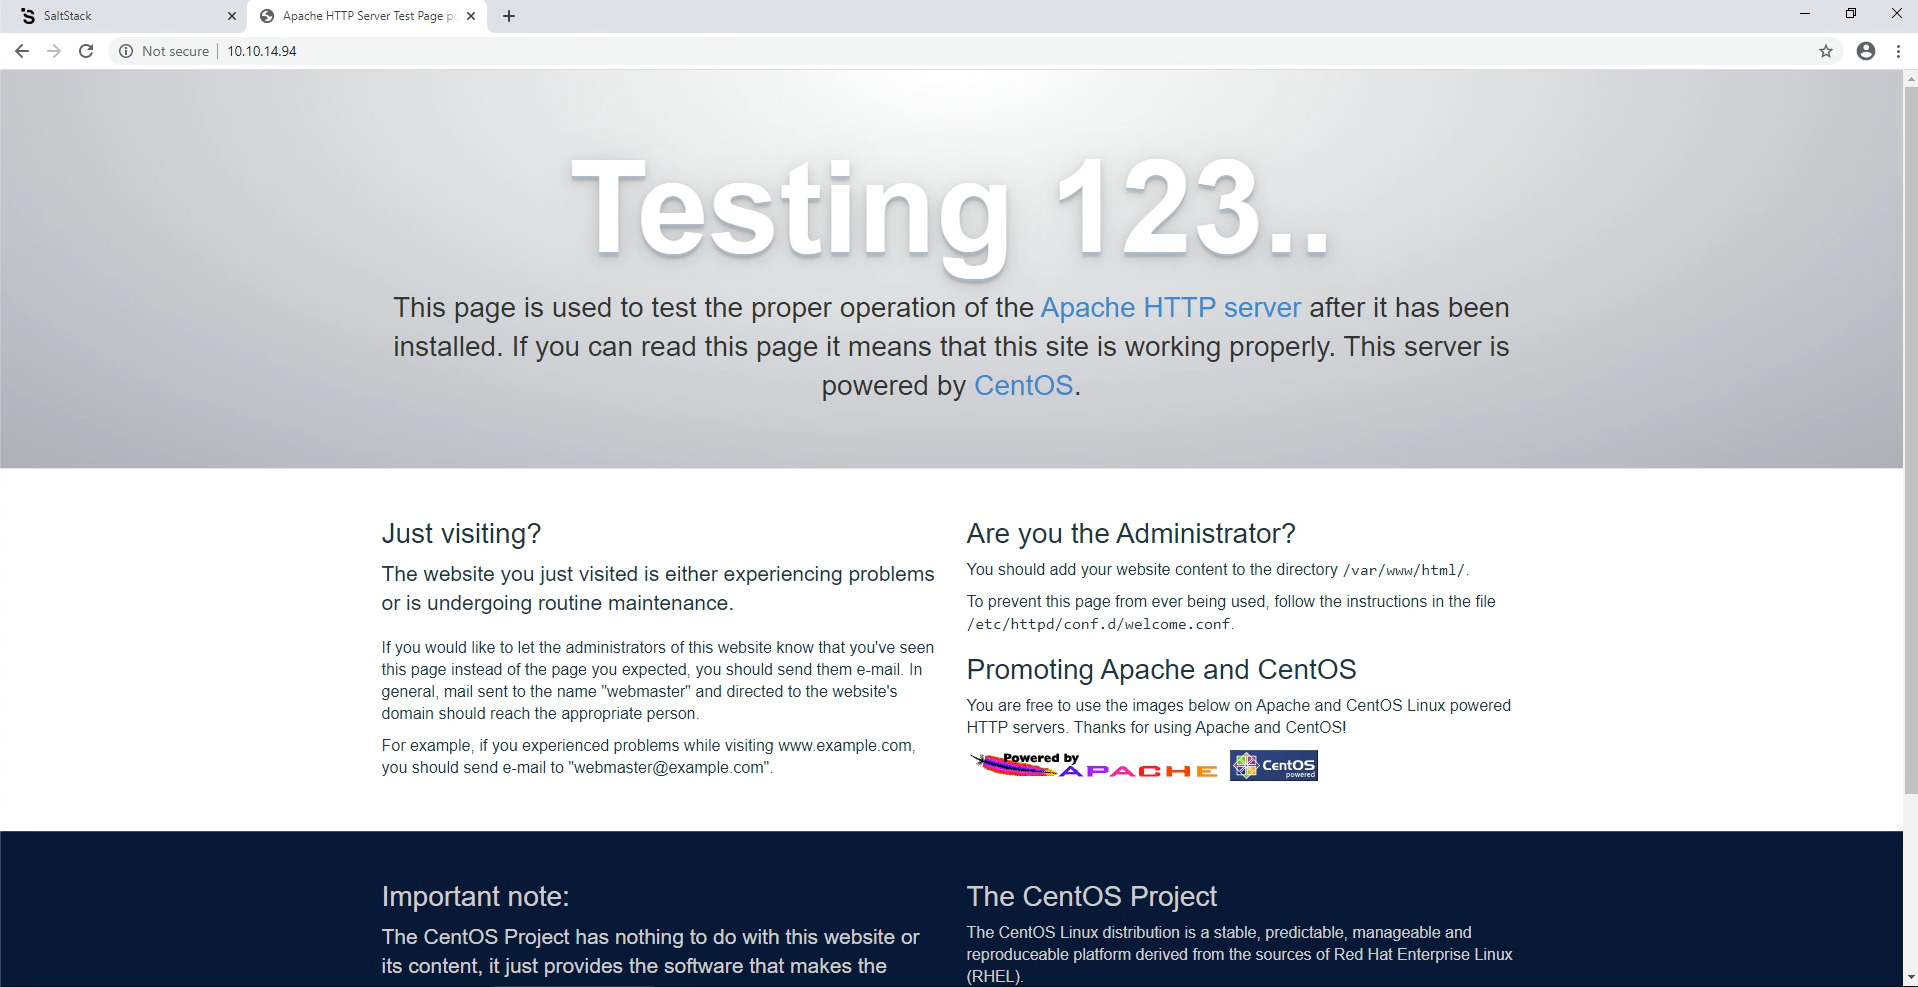
Finally you can check the Apache Web Server is actually working by simply connecting to http://<your-minion-IP-or-FQDN>:
Let me close this post with a couple of considerations:
State Module vs Execution Module, Declarative vs. Procedural
In our State file we used State Modules while in our previous post we used Execution Modules in the CLI. There is nothing complex here, State Modules leverage Execution Modules but they add the required logic to support the declarative approach answering question like: What if the package is already installed? What if the service is already started? Does it need to be restarted? Is it required to set permissions and ownership on the file in addition to just pushing it down? Would that require additional calls?
YAML
SaltStack uses YAML format … well, actually sls files can be written in a variety of formats as an sls is just a data structure comprised of dictionaries, lists, strings and numbers, etc. YAML is just the most common format for SaltStack sls files … and we all know that YAML can became tricky, but it is a safe choice with unquestionable industry adoption, “used by kubernetes”. The best practice in Saltstack sls files is to use a 4 spaces indentation (use it!).